Smart Home IoT Kit Lesson 21 4*4 Keypad
4*4 Keypadのレッスンがなかったので作る。
Smart Home IoT Kit Lesson 21 4*4 Keypad
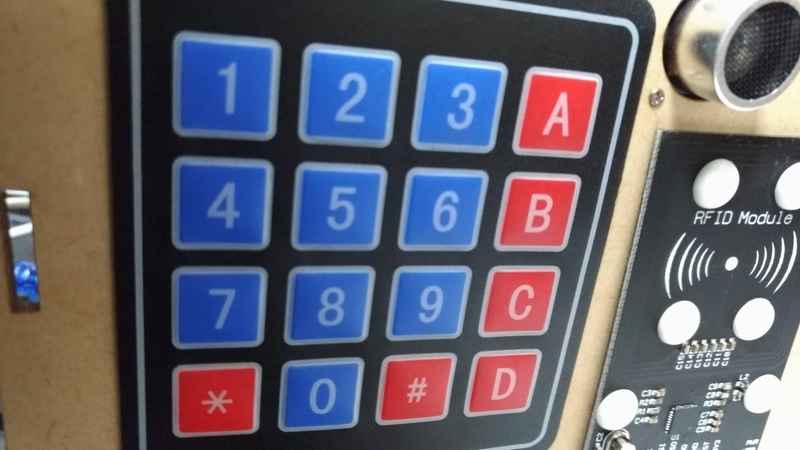
まず、基盤上にPINがアサインされているので接続する。(4×4 Keypadと書いてある)

さて、Yun Iotの
https://osoyoo.com/2018/03/22/osoyoo-yun-iot-lesson-4x4-keypad/
を参考にしてみる。
まずは、Keypadライブラリを導入
次に、Sketchにソースをコピーしてコンパイルしてみる。
#include “console.h”
#include “bridge.h”
#include “keypad.h”
const byte ROWS = 4; //four rows
const byte COLS = 4; //four columns
//define the cymbols on the buttons of the keypads
char hexaKeys[ROWS][COLS] = {
{‘1′,’2′,’3′,’A’},
{‘4′,’5′,’6′,’B’},
{‘7′,’8′,’9′,’C’},
{‘*’,’0′,’#’,’D’}
};
byte rowPins[ROWS] = {47, 45, 43, 41}; //connect to the row pinouts of the keypad
byte colPins[COLS] = {39, 37, 35, 33}; //connect to the column pinouts of the keypad

//initialize an instance of class NewKeypad
Keypad customKeypad = Keypad( makeKeymap(hexaKeys), rowPins, colPins, ROWS, COLS);

void setup(){
Bridge.begin();
Console.begin();
while (!Console);
}

void loop(){
char customKey = customKeypad.getKey();

if (customKey){
Console.println(customKey);
}
}
Arduino: 1.8.12 (Mac OS X), Board: "Arduino/Genuino Mega or Mega 2560, ATmega2560 (Mega 2560)"

smarthome-lession21iroz:1:10: error: #include expects "FILENAME" or <filename>
 #include “console.h”
          ^
smarthome-lession21iroz:2:10: error: #include expects "FILENAME" or <filename>
 #include “bridge.h”
          ^
smarthome-lession21iroz:3:10: error: #include expects "FILENAME" or <filename>

 #include “keypad.h”
          ^
exit status 1
#include expects "FILENAME" or ≷filename>

This report would have more information with
"Show verbose output during compilation"
option enabled in File -> Preferences.
なんだかエラーが出ているので、よく確認すると、 “と"で違う ”と" ’と' ‘と' ′と' も。ということで修正しとく。 なんでこうなるんだろう?
そして、ConsoleもBridgeも通らないので、ソースを変更。(ConsoleはSerialにして、Bridgeはいらない。)
それで、Keypadから入力すると動いた。入力がシリアルモニターに表示されるようになったが、押したボタンとシリアルモニターに表示される記号がずれる。
入力値 (シリアルモニタ表示)
1 (D)
2 (C)
3 (B)
A (A)
4 (#)
5 (9)
6 (6)
B (3)
7 (0)
8 (8)
9 (5)
C (2)
* (*)
0 (7)
# (4)
D (1)
どうも、ずれ方が対角線で折り返したようなずれ方。(A,6,8,*が正しい・・・・。)
https://osoyoo.com/2018/03/22/osoyoo-yun-iot-lesson-4x4-keypad/
だと、

今の基盤をみると

4*4 Keypad pin <-> 実際の基盤 <-> Webでの接続表記
1 <-> D33 <-> D47
2 <-> D35 <-> D45
3 <-> D37 <-> D43
4 <-> D39 <-> D41
5 <-> D41 <-> D39
6 <-> D43 <-> D37
7 <-> D45 <-> D35
8 <-> D47 <-> D33
の全く逆なので、反転して接続するのが良いのだろうがケーブル長が足りない。
ということで、Sketchを変更して完成。
smarthome-lession21iroz.ino
#include <Key.h>
#include <Keypad.h>

#include "SoftwareSerial.h"
SoftwareSerial EspSerial(A9, A8); // RX, TX


//#include "console.h"
//#include "bridge.h"
//#include "keypad.h"

const byte ROWS = 4; //four rows
const byte COLS = 4; //four columns
//define the cymbols on the buttons of the keypads

char hexaKeys[ROWS][COLS] = {
  {'1','2','3','A'},
  {'4','5','6','B'},
  {'7','8','9','C'},
  {'*','0','#','D'}
};
//byte rowPins[ROWS] = {47, 45, 43, 41}; //connect to the row pinouts of the keypad
//byte colPins[COLS] = {39, 37, 35, 33}; //connect to the column pinouts of the keypad

byte rowPins[ROWS] = {33,35,37,39}; //connect to the row pinouts of the keypad
byte colPins[COLS] = {41,43,45,47}; //connect to the column pinouts of the keypad


//initialize an instance of class NewKeypad
Keypad customKeypad = Keypad( makeKeymap(hexaKeys), rowPins, colPins, ROWS, COLS);

void setup(){
//Bridge.begin();
//Serial.begin();
  Serial.begin(9600);

while (!Serial);
}

void loop(){
char customKey = customKeypad.getKey();

if (customKey){
Serial.println(customKey);
}
}
ちゃんと動きました。
Lession21(自作)作成完了!
このKitに入っている4*4 Keypad使えるようになりました。
